Subversion is ultimately one of the best source control option we have in today’s world. it has very light instance running on Server and of course it is FREE.
To access the Subversion repository on the client machine we have multiple options. If we want to use shell integrated UI (means we can call your source control options in our windows explorer), we can use TortoiseSVN but being a developer based on Visual Studio it always looks good to get my source control on Solution Explorer inside Visual Studio world and for that we have Visual SVN which off cost and AnkhSVN which is FREE.
One time server configuration is needed on almost every server software so as with SVN. After downloading and installing SVN following configuration is needed in order to work properly. By the way, we are assuming that you download the setup from CollabNet.
Download URL : http://www.open.collab.net/downloads/subversion/
Installing SVN (CollabNet):
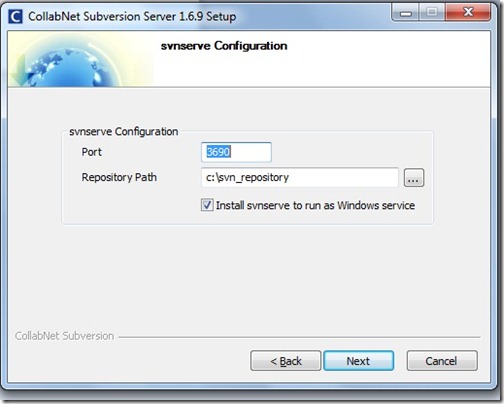
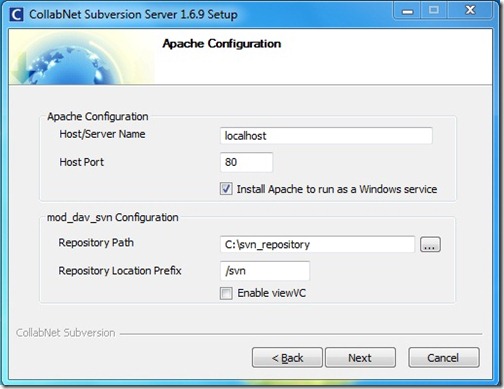
This installation is next next stuff but the following screens needs a little awareness.

Port will be the default port on which the Subversion server listen for the request and the repository is a location where your source code will be saved.
Notice the checkbox, titled “Install svnserve to run as Windows service”. If this box is checked SVN will run as windows service and will be available as soon as the Server Machine starts.

It is important to understand that the SVN works on the Apache web server. If you are already using any other web server such as IIS, it is important to change the port of the Web Server. Also, an other checkbox is available to run the Apache web server as windows service.
Configuration:
Well, the above mentioned setup has done almost every thing for us. But still following configuration needs to understand in case of getting command over SVN.
- Configure SVN to run as service (Manually)
- Creating Repository (Manually)
- Configure Security
- Enable / Disable anonymous access
- Create Users
- Authorization
- Firewall Consideration
Configure SVN to run as service (Manually):
To create SVN run as Windows service, we need to open CMD and run the following command
sc create svnserve binpath= "
    \C:\Program Files (x86)\CollabNet\Subversion Server\svnserve.exe\"
    --service --root c:\repos" displayname= "SubVersion Server"
    depend= tcpip start= auto
Notice that the path of the svnserve.exe might be change in your case. Once we run this we can now see our newly created service in the service console.

Just in case, if we want to delete the service we can run the following command in cmd
sc delete svnserve
Creating Repository (Manually):
To create repository we need to use svnadmin utility. Following is the procedure
- Go to Run (Ctrl + R) –> CMD
- Go to the install directory of SVN in my case it is ( C:\Program Files (x86)\CollabNet\Subversion Server)
- Run command : svnadmin create C:\svn_repository (we can change the path according to our need)
Configure Security:
Like other source control, you can create users in svn, give them right what they can do and all that important stuff but the user right assignments are change from repository to repository.
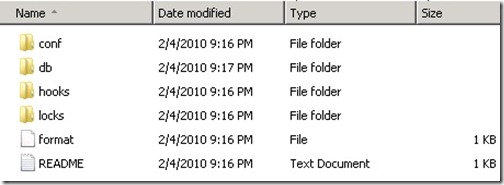
Once you successfully create a repository, you will find the following items under the folder of repository.

Now open the “conf” folder and create the following file (if it is not already there)svnserve.conf
and add the following lines
[general]
anon-access = read
auth-access = write
authz-db = authz
password-db = passwd
Disable anonymous access:
Anonymous access can be very useful in many scenario but in our case, we want to disable this access. To do this, we will edit svnserve.conf file and comment the anon-access line. after editing that file, svnserve.conf file will look like as below
[general]
#anon-access = read
auth-access = write
authz-db = authz
password-db = passwd
Of course, to enable the access we have to un comment this line.
Create Users :
If you have notice the last line we wrote in svnserve.conf file, it is password-db = passwd. Basically, it is the name of the file which contains the information about users.
Now lets create a file named “passwd” with no extension and add the following lines.
[users]
admin = adminpassword
admin2 = admin2password
ausman = ausmanpassword
ruser = ruserpassword
Note that the string before “=” is user id and the later one is password. if you still confuse, here is the formulae :)
username = password
That’s how, this file is saving the user information. Now, create as many users you want.
Authorization:
Now notice the second last line of the svnserve.conf file, where it says authz-db = authz. Basically, it is the name of the file which contains the authorization information about the users.
Now let’s consider the situation, where you want to create two set of users in your repository. It can be “Administratots” and ‘Regular Users’. You want to give read / write permission to both the users but on some folders you want only “Administrators” to write files.
Now lets create a file named “authz” with no extension and add the following lines.
[groups]
adminstrators = admin, admin2
regulars = ausman, ruser
[repository:/]
* =
@adminstrators = rw
@regulars = rw
[repository:/trunk/admin-files]
* =
@adminstrators = rw
Ok, now let me explain how we did the whole thing line by line. In the first three lines we simple created two groups that we discussed before.
On line no 4-7, we gave general write permission on every folder of the repository to both the groups.
On line no 8-10, we gave a special write permission to group named “Administrators” for a folder called “admin-files”.
There we go, every thing is configured and we are ready to access the files from SVN Client.
Firewall Consideration:
As mentioned earlier SVN server listen for the request on port number 3690. In my case of implementation, the server was using Windows 2008 built-in Firewall which means, I can access the SVN server locally but from any remote machine I wasn’t able to get the files..
To do that, we simply need to add the port 3690 in the exception list of Firewall and allow the traffic coming thru this port.
That’s it and we are all done :)